The Conversation Settings tab controls automation behavior, lead capture logic, and engagement flow.
3.1 Initial Greeting #

The first message displayed when users open the chat widget.
Example:
“Hello! How can I help you today?”
This message should be welcoming and encourage engagement.
3.2 Lead Collection #
Enable this feature to allow the AI Assistant to collect visitor contact details.
Collected data may include:
- Name
- Phone
Lead Collection Triggers #
Define when the AI should request contact information:
Pre-Chat Form #
The Pre-chat form allows you to request a visitor’s contact details before the AI assistant starts the conversation.
When this option is enabled, visitors will be prompted to provide their contact information before interacting with the assistant. This helps capture leads and allows you to follow up with users later.
To enable this feature:
- Turn on the Pre-chat form option.
- Once enabled, a message will appear before the lead form is shown to the user.
You can customize this message by clicking Edit message.
Editing the Pre-Chat Intro Message #
Click Edit message to modify the message displayed before the lead form appears.
This message is shown to users during their first interaction with the assistant, explaining why their contact details are being requested.
In the Message text field, you can write or update the text that will appear to visitors.
After making your changes, click Update to save the message.
On Lead Intent #
When On lead intent is enabled, the assistant will request contact details when the system detects that a user is showing buying or conversion intent during the conversation.
This typically happens when a visitor asks about services, pricing, bookings, or other actions that indicate interest.
After a Number of Assistant Responses #
You can choose to ask for contact details after a specific number of assistant replies.
- Enable After X assistant responses.
- Enter the number of responses after which the contact request should appear.
- Click Edit message to customize the message shown to the user.
The message will appear once the assistant reaches the specified number of replies in the conversation.
After a Period of Inactivity #
You can also prompt users for their contact details if they stop responding during the conversation.
- Enable After X seconds of inactivity.
- Set the number of seconds the system should wait.
- Click Edit message to customize the message.
This message appears when a visitor has been inactive for the specified period.
On Exit Intent #
The On exit intent option triggers the contact request when the system detects that the visitor may be about to leave the page.
This gives you a final opportunity to capture the user’s contact details before they exit.
You can click Edit message to customize the message displayed in this situation.
Editing Contact Messages #
For each trigger option, the Edit message button allows you to customize the text that appears when the assistant asks for contact details.
After editing the message, click Update to save your changes.
Enable Lead Notifications #

The Lead Notifications option allows you to receive email notifications whenever the AI Assistant collects a new lead.
To use this feature, enable the Enable Lead Notifications toggle. Once enabled, an email notification will be sent whenever a visitor submits their contact details through the assistant.
This helps you quickly identify and follow up with new leads captured through your AI Assistant.
3.3 Contact Form Customization #
Click Edit Contact Form to configure:
Form Structure #
Choose required fields:
- Email only
- Name + Email
- Name + Phone
- Name + Email + Phone
Success Message #
Displayed after successful submission.
Example:
“Great! You will be contacted soon.”
Post-Lead Message #
Appears immediately after form submission to continue conversation.
Text Labels #
Customize form field labels:
- Name field label
- Phone field label
- Email field label
- Skip button label
- Submit button label
Error Messages #
Define validation messages for:
- Empty name
- Invalid phone
- Invalid email
- No contact provided
Clear error messaging improves completion rates.
3.4 Starter Questions #

Enable Show Starter Questions to display clickable prompts in the chat window.
You may add up to three suggested questions.
Examples:
- “How can I contact you?”
- “What services do you offer?”
- “What are your pricing options?”
Starter questions reduce friction and improve engagement.
3.5 Follow-Up Questions #
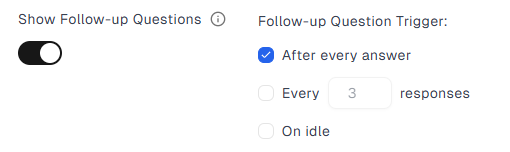
Enable automated follow-up prompts to maintain engagement.
Trigger options:
- After every answer
- After every X responses
- On user inactivity
This feature helps re-engage users and improve lead conversion.