The AI Assistant Settings section allows you to configure your AI Agent’s identity, behavior, training data, automation rules, and controlled responses.
This step includes four tabs:
- General Settings
- Training Sources
- Conversation Settings
- Predefined Questions
Each section plays a critical role in determining how your AI Assistant responds and interacts with website visitors.
1. General Settings #
The General Settings tab defines the assistant’s identity, tone, and foundational instructions.
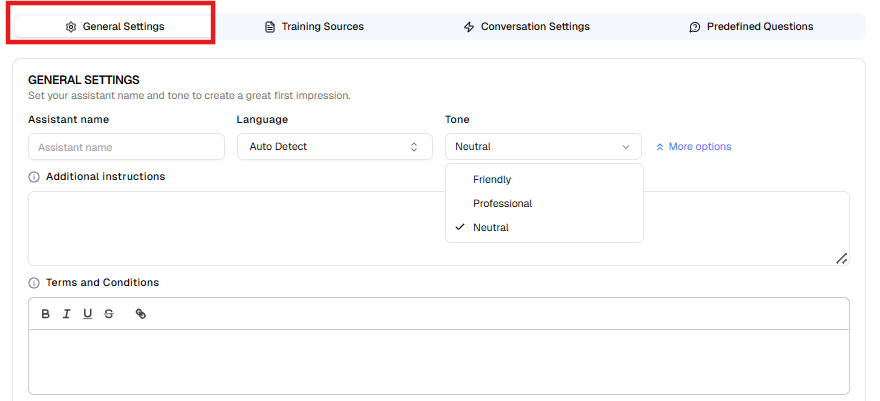
1.1 Assistant Name #
Specify the name of your AI Assistant.
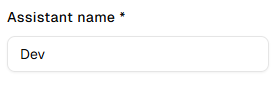
The assistant name will be used internally to identify the AI assistant across leads, the dashboard, and other assistant-related sections.
Examples:
- Support Assistant
- Help Desk Bot
1.2 Language #
Select the primary language used by the AI Assistant.
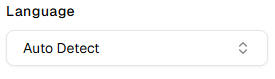
Available options:
- Auto Detect (Recommended for multilingual websites)
- Manual language selection
If your audience speaks a single language, selecting it manually ensures more consistent responses.
1.3 Tone #
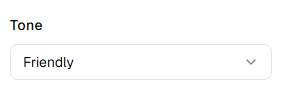
Define the communication style of the AI Assistant.
Common tone options include:
- Friendly
- Professional
- Netural
The selected tone influences greeting style, phrasing, and overall conversational personality.
1.4 Additional Instructions #

Use this field to provide custom behavioral guidance to the AI Assistant.
You may define:
- Brand voice rules
- Escalation instructions
- Restricted topics
- Sales priorities
- Compliance limitations
Example instructions:
- “Encourage users to book a demo when discussing pricing.”
- “Do not provide medical or legal advice.”
- “Escalate billing issues to human support.”
These instructions refine how the AI generates responses.
1.5 Terms and Conditions #

Configure the disclaimer text displayed in the chat interface.
This section typically includes:
- Terms of use acknowledgment
- Privacy policy notice
- Legal disclaimers
Example:
“By chatting, you agree to our AI Terms of Use.”
You may format the text and insert hyperlinks where necessary.
2. Training Sources #
The Training Sources section allows you to provide website pages that the AI Assistant will use as knowledge sources. By adding links from your website, the assistant can crawl those pages and use the content to answer user questions more accurately.
To set up the training sources, you can either add custom links or use the Add Links option to crawl pages from your website and select the ones you want to include.
Crawling Website Pages– Add links #
After clicking Add Links, you will see the Add website pages to AI Assistant modal.
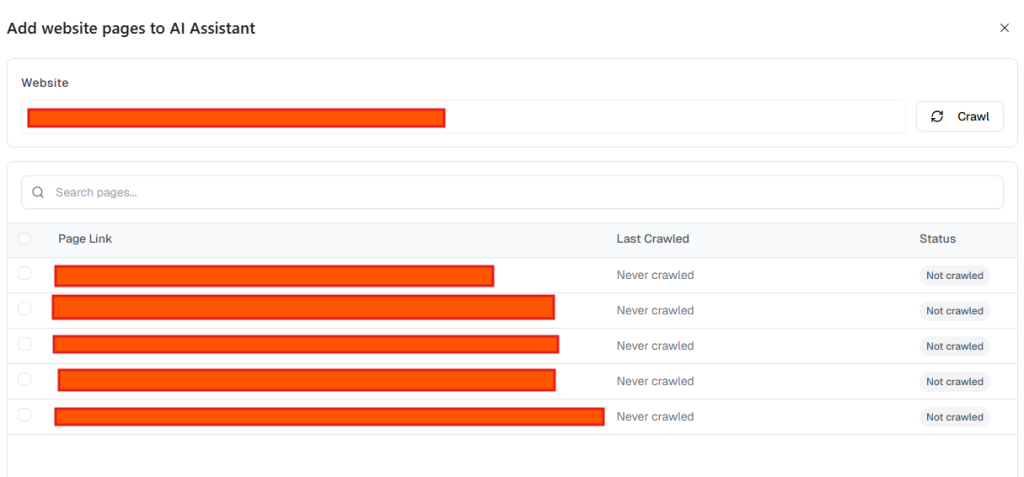
- Enter Website URL
By default, your site URL will be displayed, and this cannot be changed. - Click Crawl
Press the Crawl button to scan the website. The system will detect available pages. - Select Pages
A list of discovered pages will appear. Each page includes:- Page Link – the detected page URL
- Last Crawled – when the page was last scanned
- Status – whether the page has been crawled
- Choose Pages to Train the AI
Select the checkbox next to the pages you want to include. - Add Selected Pages
Click Add to include the selected pages in the assistant’s training sources.
Page Status Indicators #
- Not Crawled – The page has been discovered but not yet processed.
- Last Crawled – Shows the last time the page content was analyzed.
Training Source Limits #
- Each assistant can include up to 15 website links.
- The counter at the bottom of the modal shows how many pages are already added.
Tips for Better Training #
Update and re-crawl pages when the website content changes so the AI assistant stays up to date.
Add pages that contain important information about your business, services, or FAQs.
Avoid adding author pages, category pages, or empty template pages unless they contain useful content.
Removing Pages #
Click the Delete icon to remove a page from training.
Once removed, the AI will no longer reference that content.
2.2 Documents #
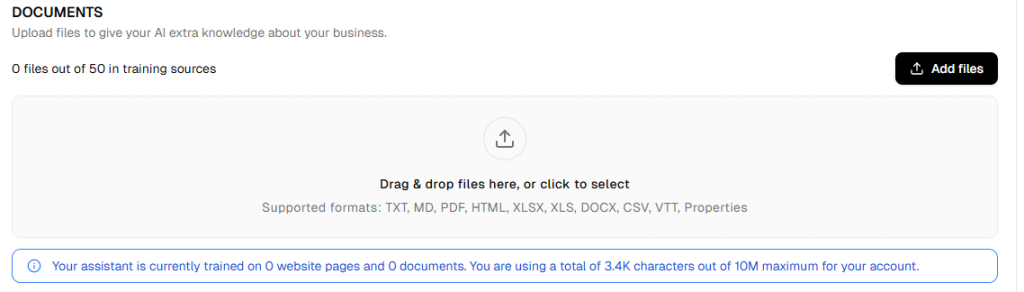
Upload additional files to enhance the assistant’s knowledge base.
Supported formats include:
- TXT
- MD
- HTML
- XLSX / XLS
- DOCX
- CSV
- VTT
- Properties
Upload via:
- Drag and drop
- Add Files button
Documents are indexed and included in training.
3. Conversation Settings #
The Conversation Settings tab controls automation behavior, lead capture logic, and engagement flow.
3.1 Initial Greeting #

The first message displayed when users open the chat widget.
Example:
“Hello! How can I help you today?”
This message should be welcoming and encourage engagement.
3.2 Lead Collection #
Enable this feature to allow the AI Assistant to collect visitor contact details.
Collected data may include:
- Name
- Phone
Lead Collection Triggers #
Define when the AI should request contact information:
Pre-Chat Form #
The Pre-chat form allows you to request a visitor’s contact details before the AI assistant starts the conversation.
When this option is enabled, visitors will be prompted to provide their contact information before interacting with the assistant. This helps capture leads and allows you to follow up with users later.
To enable this feature:
- Turn on the Pre-chat form option.
- Once enabled, a message will appear before the lead form is shown to the user.
You can customize this message by clicking Edit message.
Editing the Pre-Chat Intro Message #
Click Edit message to modify the message displayed before the lead form appears.
This message is shown to users during their first interaction with the assistant, explaining why their contact details are being requested.
In the Message text field, you can write or update the text that will appear to visitors.
After making your changes, click Update to save the message.
On Lead Intent #
When On lead intent is enabled, the assistant will request contact details when the system detects that a user is showing buying or conversion intent during the conversation.
This typically happens when a visitor asks about services, pricing, bookings, or other actions that indicate interest.
After a Number of Assistant Responses #
You can choose to ask for contact details after a specific number of assistant replies.
- Enable After X assistant responses.
- Enter the number of responses after which the contact request should appear.
- Click Edit message to customize the message shown to the user.
The message will appear once the assistant reaches the specified number of replies in the conversation.
After a Period of Inactivity #
You can also prompt users for their contact details if they stop responding during the conversation.
- Enable After X seconds of inactivity.
- Set the number of seconds the system should wait.
- Click Edit message to customize the message.
This message appears when a visitor has been inactive for the specified period.
On Exit Intent #
The On exit intent option triggers the contact request when the system detects that the visitor may be about to leave the page.
This gives you a final opportunity to capture the user’s contact details before they exit.
You can click Edit message to customize the message displayed in this situation.
Editing Contact Messages #
For each trigger option, the Edit message button allows you to customize the text that appears when the assistant asks for contact details.
After editing the message, click Update to save your changes.
Enable Lead Notifications #

The Lead Notifications option allows you to receive email notifications whenever the AI Assistant collects a new lead.
To use this feature, enable the Enable Lead Notifications toggle. Once enabled, an email notification will be sent whenever a visitor submits their contact details through the assistant.
This helps you quickly identify and follow up with new leads captured through your AI Assistant.
3.3 Contact Form Customization #
Click Edit Contact Form to configure:
Form Structure #
Choose required fields:
- Email only
- Name + Email
- Name + Phone
- Name + Email + Phone
Success Message #
Displayed after successful submission.
Example:
“Great! You will be contacted soon.”
Post-Lead Message #
Appears immediately after form submission to continue conversation.
Text Labels #
Customize form field labels:
- Name field label
- Phone field label
- Email field label
- Skip button label
- Submit button label
Error Messages #
Define validation messages for:
- Empty name
- Invalid phone
- Invalid email
- No contact provided
Clear error messaging improves completion rates.
3.4 Starter Questions #

Enable Show Starter Questions to display clickable prompts in the chat window.
You may add up to three suggested questions.
Examples:
- “How can I contact you?”
- “What services do you offer?”
- “What are your pricing options?”
Starter questions reduce friction and improve engagement.
3.5 Follow-Up Questions #
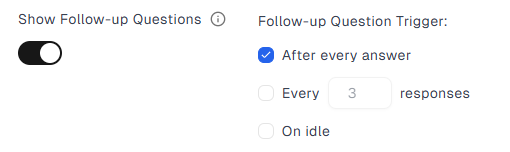
Enable automated follow-up prompts to maintain engagement.
Trigger options:
- After every answer
- After every X responses
- On user inactivity
This feature helps re-engage users and improve lead conversion.
4. Predefined Questions #

The Predefined Questions tab allows you to create curated question-and-answer pairs.
These act as controlled responses for frequently asked queries.
Adding a Predefined Question #

- Click Add Question.
- Enter the question.
- Provide the curated answer.
- Save.
Use this feature for:
- FAQs
- Policies
- Pricing
- Compliance-sensitive information
Editing or Deleting Entries #
Each entry includes:
- Edit option
- Delete option
- Bulk selection tools
- Search functionality
Limiting Replies to Predefined Answers #
Enable Limit replies to predefined answers to restrict the AI to only use predefined responses.
When enabled:
- Dynamic responses from website content are disabled.
- Only curated answers are used.
Recommended for:
- Regulated industries
- Strict compliance environments
- Fully controlled messaging requirements
When disabled:
The assistant combines:
- Website training data
- Uploaded documents
- Predefined answers
for flexible, intelligent responses.
Saving and Publishing #
After completing configuration:
- Click Save to store changes.
- Click Save & Publish to apply settings live.
Once published, your AI Assistant will operate based on:
- Configured identity and tone
- Defined training sources
- Automated lead capture rules
- Starter and follow-up engagement logic
- Curated predefined responses