The Email widget allows visitors to your website to send you an email directly by clicking a button displayed on the screen. When a visitor clicks it, their default email application will open with your email address already filled in — making it quick and convenient for them to get in touch.
You can add one or more email addresses, assign them to specific team members or departments, set their availability hours, and customise how the widget appears to your visitors. This guide will walk you through every step of the setup process in plain, simple language — no technical knowledge required.
Important: Make sure the email address you add is active and checked regularly. Visitors who reach out by email will expect a timely response, so always use an address that your team monitors closely.
Adding the Email Channel to Your Widget #
When you first open the widget settings, you will land on the Channel Selection screen. This is where you choose which contact channels you want to display on your website — such as Email, Phone, WhatsApp, and others.
To add the Email channel:
- Click on Email to add it to your widget.
- Once selected, it will appear in your active channels list at the bottom of the screen.
- You will know it has been added when you see an email icon with the label Email in the list.
Note:You can add multiple channels at the same time. Email is just one of several options available to you alongside Phone, WhatsApp, and others.
Entering Your Email Address and Contact Details #

After adding the Email channel, a row of fields will appear for you to fill in. These fields control how your email contact is displayed to visitors on your website.
Here is what each field means:
- Email — Type in the email address you want visitors to send messages to, for example [email protected] or [email protected].
- Channel label — This is the text shown to your website visitors next to the email button. By default it says “Email” but you can change it to something like “Email Us” or “Send Us a Message”.
- Custom image — If you would like to use your own icon instead of the default email icon, click Choose file and upload your image.
- Channel color — Click the colour box to pick a colour for your email button. Choose a colour that matches your website’s branding.
- Show on — Select whether the email button should appear on Desktop, Mobile, or both by clicking the relevant icons.
Tip: If you have more than one email address — for example, a separate address for Sales and for Support — click the Add new contact button at the top right to add another row and fill in the details the same way.
Editing Individual Contact Settings #
Each email contact you add has its own individual settings panel. These allow you to personalise each contact further and make it easier for visitors to know who they are reaching out to before they send their message.
To open a contact’s settings:
- Find the contact row you want to edit.
- Click the Settings button on the right-hand side of that row.
- A panel called Email contact settings will open.
Role and Contact Avatar #
- Role — Enter the role of the person behind this email address, for example “Customer Support”, “Sales”, or “Billing”. This will be shown to visitors so they know who they are emailing before they reach out.
- Contact avatar — Upload a photo or image for this contact by clicking Choose file. Adding a photo gives a personal touch and helps visitors feel more comfortable sending a message.
Once you have made your changes, click Update contact to save them.
Setting Your Availability Schedule #
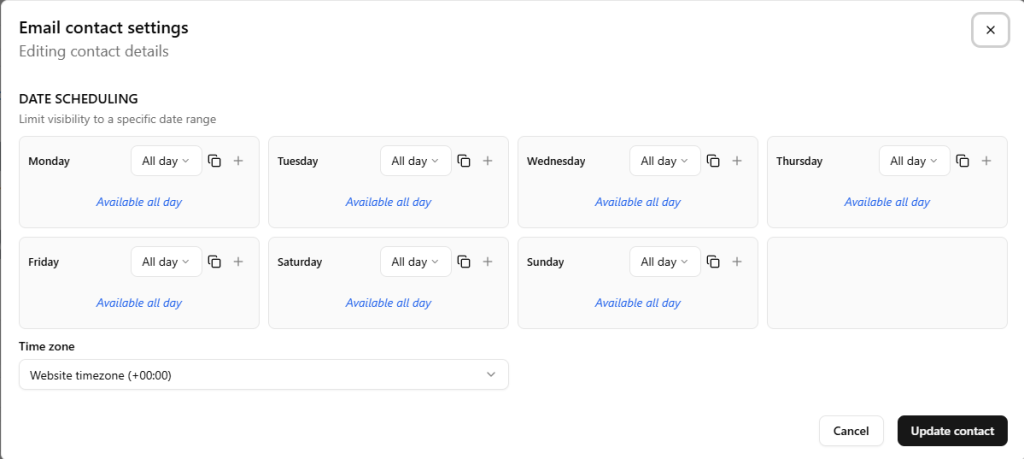
You may not want the email button to be visible to visitors outside of your working hours. The Date Scheduling section lets you control exactly when each contact appears on your website, down to specific hours on specific days of the week.
Choosing Availability Per Day #
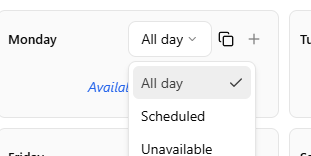
You will see a grid showing all seven days of the week — Monday through to Sunday. For each day, click the dropdown menu and select one of the following options:
- All day — The contact will be visible to visitors throughout the entire day. This is the default setting.
- Scheduled — Choose this to set specific hours, for example 9:00am to 5:00pm on weekdays.
- Unavailable — Choose this to hide the contact completely on that day, for example on weekends or public holidays.
Tip: Unlike phone or WhatsApp, email does not require an immediate response — so you may be comfortable leaving the email button visible at all times. However, hiding it outside office hours can help manage visitor expectations about response times.
Copying a Schedule to Multiple Days #
If your availability is the same across several days, you can copy one day’s schedule to others quickly:
- Click the copy icon (the two overlapping squares) next to the day you want to copy from.
- A small menu will appear listing all the other days of the week.
- Tick the days you want to apply the same schedule to.
- Click Apply.
The schedule will be copied across to all the days you selected automatically.
Setting Your Time Zone #
At the bottom of the scheduling section you will find a Time zone dropdown. Make sure this is set to the correct time zone for your business so that your availability hours display accurately to visitors regardless of where they are in the world. By default, it is set to match your website’s time zone.
When you are happy with all the settings, click Update contact to save.
Customizing the Multi-Contact Pop-Up Message #
If you have added more than one email contact, visitors will see a small pop-up when they click the widget button showing all available contacts to choose from. You can customise the text in this pop-up.
To customise the pop-up message:
- Click the Multi-contact settings button at the top of the Email channel panel.
- A window will appear with two fields to fill in:
- Headline — The bold title text shown at the top of the pop-up. For example: “We’re here to help!”
- Welcome message text — The smaller description text shown below the headline. For example: “Send us a message and we will get back to you as soon as possible.”
Type in whatever text feels right for your business, then click Update to save your changes.
Final Notes #
Your Email widget is now fully set up. Visitors to your website will be able to see your email contact button, know who they are writing to, and reach out during the hours you have specified.
If you ever need to make changes — such as updating an email address, adding a new contact, or adjusting your availability hours — simply return to the widget settings area and follow the same steps outlined in this guide.